|

Thanks to LadyValella for allowing me to exclusively translate his
tutorials

Find the original of this tutorial here

It was created with Paint
Shop Pro X9, but can also be done with other versions of PSP
To translate it I used PSP
XII
***
Material here

***
Filters
Mura's Meister - Perspective tiling
***
Open the material in your workspace
Open a new 800 x 600 pixel, transparent image
Selections - Select all
Open the image "_drop_6_by_somebody_else-d6ax7sw"
Edit - Copy
Go back to your work
Edit - Paste into selection
Deselect
Layers - Duplicate
Effects - Plugins - Mura's Meister - Perspective tiling

Layers - Merge - Merge Down
Layers - Duplicate
Close the original layer (raster1)
Activate the tube "tablet01-LV18"
Edit - Copy
Go back to your work
Edit - Paste as new layer
Image - Resize to 50%, all layers unselected
Erase the logo
Effects - 3D Effects - Drop Shadow, black
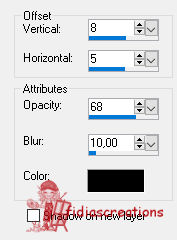
Effects - Image Effects - Offset
Activate the "frameTablet" tube
Edit - Copy
Go back to your work
Edit - Paste as new layer
Position yourself on the layer Copy of Merged
Activate the eraser tool and erase the corners, like the screenshot
below
Layers - Merge - Merge Visible
Image - Resize to 90%, all layers unselected
Effects - 3D Effects - Drop Shadow, same as before
Open and activate layer Raster 1
Adjust - Blur - Gaussin Blur, Radius 4
Place yourself on the top level
Image - Add border 10 px, color #000000
Image - Add border 10 px, color #ac587d
Image - Add border 10 px, color #000000
Activate the tube "tablet01-LV18"
Edit - Copy
Go back to your work
Edit - Paste as new layer
Image - Resize to 50%, all layers unselected
Erase the logo
Effects - 3D Effects - Drop Shadow, same as above
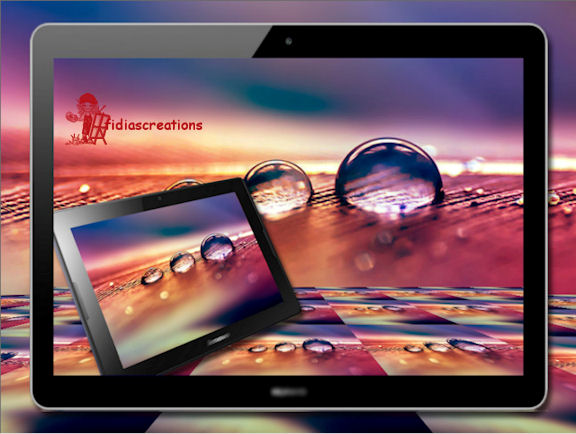
Position in the lower left, like the finished image
Activate the tube "@ann_280505_Sorayama09_TD.psp"
Edit - Copy
Go back to your work
Edit - Paste as new layer
Image - Reflect
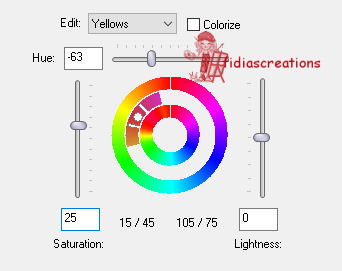
Adjust - Hue and Saturation - Hue/Saturation/Lightness
Effects - 3D Effects - Drop Shadow, same as above
With a font of your choice write "Technology"
Layers - Merge - Merge All (flatten)
Adjust - Focus - Focus
Post the LadyValella logo
Sign your work
Save in JPG format
***
If you have
problems running the tutorial or just want to tell me you liked it,
write me

***
translated 03/06/2023
*
Backwards
©Fidia's CreationsAll Rights Reserved
Designed and Maintained by Fidia's Creations |