|
Thanks to LadyValella for allowing me to
exclusively translate her tutorials

Find the original of this tutorial here

It was created with Paint Shop Pro X9, but it can
be done with other versions of PSP as well
To translate it I used PSP XII
***
Material here

***
Step 1
1 - Activate the "WinterWonderland" template on psp
2 - Window - Duplicate
Close the original
3 - Close all layers
4 - Now open levels: Raster 9,14,11
5 - Activate Raster11 layer
6 - Effects > 3D Effects - Drop Shadow, Black

7 - Layers > Merge Visible
Step 2
8 - Open the Raste 5 layer and activate it
9 - Selections - Select all
Selections - Mobile
Selections - Immobilize
10 - Activate "paper0.jpg"
Edit - Paste as new layer
11 - stay on the level of the paper
12 - Selection - Invert
Press Delete
13 - Selections - Cancel selection
14 - Open the Raster 4 layer and activate it
15 - Effects - 3D Effects - Drop Shadow, black
16 - Layers - Merge visible.
Step 3
17 - Activate "LV-Ghiande"
Edit -Copy
Paste as a new layer
Move a little to the right.
18 - Effects - 3D Effects - Drop Shadow, black
Step 4
19 - Open Raster 2 and activate it
20 - Selections - Select all
Selection - Mobile
Selections - Immobilize
21 - Copy the pattern "countrycharm-bottomtile"
Edit - Paste into selection
22 - Selections - Deselect
23-Open Raster 6 and activate it.
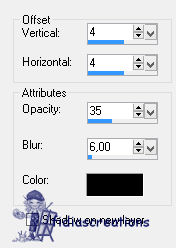
24 - Effects - 3D Effects - Drop Shadow 4, 4, 35, 6, black
25 - Layers - Merge - Merge Down
step 5
26-Open the Merged level and activate it
Activate the Magic Wand tool

27 - Select the small triangle at the top of the tree
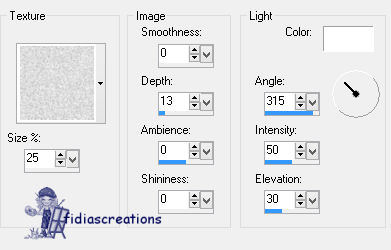
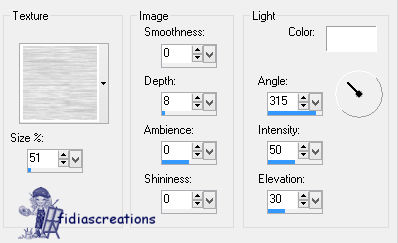
28 - Effects > Texture Effects > Texture > Paper (thick paper)
29 - Selections - Deselect
30 -Now select the bottom blue part of the tree (not the pot)
31-Effects > Texture Effects > Texture > Long Grain
32 - Selections - Deselect.
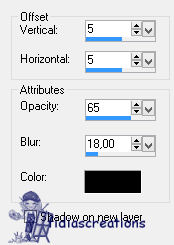
33 - Effects - 3D Effects Drop Shadow 5, 5, 65, 18, black
step 6
34 - Activate "6_Swirl_LV"
Edit - Copy
Edit - Paste as new layer
35 - Image - Resize - Resize 75%, all layers unchecked
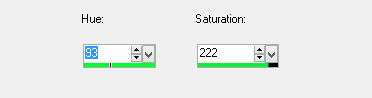
36 - Adjust - Hue and Saturation - Colorize
37 - Image - Mirror
Move down and left
38 - Shadow as above
Duplicate the layer - Go up a bit
step 7
39 - Open and activate Raster layer 3
40 - Selections - Select All
Selection - Mobile
Selections - Immobilize
41 - Copy "Motivo Tasselli" and paste it into the selection
Selections - Deselect.
42 - Open the Raster 7 layer and activate it
43 - Effects - 3D Effects - Drop Shadow: 4, 4, 35, 6, black
step 8
44 - Open the layer Raster 16, Raster 10 and raster 13
45 - Activate Raster layer 13
46 - Open "2645_TRagenTube"
Edit - Copy
Edit - Paste as new layer
47 - Resize 70% all unchecked layers
48 - Image Effects > Displacement
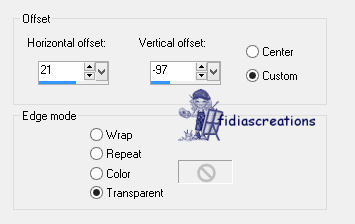
49 - Image > Flip horizontally -Delete the logo
50 - Effects - 3D Effects - Drop Shadow: 4, 4, 35, 6, black
Adjust - Sharpness - Focus
step 9
51 - Open "magic book"
Edit - Copy
Edit - Paste as new layer
52 - Image - Resize to 70% All layers unchecked
Locate at the bottom right.
53 - Shadow as above
step 10
54 - Put a pipe of your choice that has a fantasy theme
55-Effects - 3D Effects - Drop Shadow, Black
step 11
56 - Layers - Merge - Merge visible
57 - Image - Resize to 90%, all layers unchecked
step 12
58 - Open Raster 8 and Raster 12 layers
Activate Raster layer 12
59 - Fusion Down
Go up a bit
60 - Open and activate the Shasta Marie layer, move it and place it
below the text
61 - Open and activate the "Promoted Selection" level
62 - Fusion visible
63 - Edition - Copy "Background"
Edit - Paste as new layer
64 - Layers - Arrange - Send to back
Put credits to your signature and save in png
The work is done
***
If you have
problems running the tutorial or just want to tell me you liked it,
write me

***
translated 02/09/2023
*
Backwards
©Fidia's CreationsAll Rights Reserved
Designed and Maintained by Fidia's Creations |